How to Use a Hydroseeder

Share this article!
Learning how to use a hydroseeder properly is important to efficiently and effectively apply seed over large areas like lawns, sports fields, and highway corridors. Considering its many benefits — like saving time and money — compared to other methods for seeding, it’s no wonder learning how to hydroseed and DIY hydroseeding is gaining popularity among landscapers, homeowners, and contractors of all kinds.
While generally done by industry professionals, it is possible to learn how to hydroseed yourself if you’ve got the time and willingness to learn.
Learning how to use a hydroseeder properly includes five key steps to consider:
- Finding hydroseeding equipment and materials
- Preparing the ground
- Properly mixing the right seed and materials
- Using the hydroseeder itself
- Caring for and maintaining ground after the process is complete to ensure good results
Understanding these steps can help you decide whether or not you can, or should, pursue do it yourself hydroseeding. We’ll go through what’s involved in each of these steps to help you make the right choice for your project and your needs.
Step 1: Find the Right Hydroseeder for your Project
Many equipment rental companies rent hydroseeders by the day or the hour. Chances are, you can also find a Finn HydroSeeder dealer in your area. It’s important to know the details of your hydroseeding project before you check with a rental outlet, since they may or may not be able to help you find the right machinery based on the size of your project. Learn more about how to choose the right hydroseeder for your project, and make sure you’ve done your measurements so you know what you’re looking for.
It’s also worth doing a little research on the kind of seed, or mix of seed, that will work for your area and your project. While suppliers can generally provide a little direction with this, it will help to get the results you’re looking for.
Step 2: How to Prep for Hydroseeding
Once you’ve located the right hydroseeder and determined where you’ll buy your materials, the next step toward learning how to use a hydroseeder is properly preparing the ground. This is one of the most important steps because it’s ultimately responsible for how well your lawn takes root.
It’s crucial, to achieve the best results for a lawn, that the ground be:
- Level or smooth
- Loose, not hard or compacted
- Free of debris like rocks, sticks, and weeds
- Raked if possible to provide the best environment for seeds to establish
Again, don’t rush this portion of the hydroseeding process as it quite literally lays the foundation for your project. If you are seeding a field for erosion control, these steps are not as critical. Everything else can be spot on, but if the ground isn’t ready, the end result will suffer.
Step 3: How to Make Hydroseed Mixture
Once you’ve made sure the ground is prepared, and you know how much material you’ll need to prepare your hydroseeding mixture, you can mix. The best hydroseed mixture, or slurry, should include six main components:
- Seeds themselves
- Water
- Mulch
- Tackifiers
- Fertilizer
- Dye (optional)
Additionally, you can choose to include things like herbicides or biostimulants as needed. Mixing the hydroseed is crucial to the success of your project because you’ll need the right combination of materials to provide the best results for your lawn. Most products will come with instructions on mixing them, but it’s always a good idea to ask where you’re purchasing — this will help you not only get the right materials, but give you an idea as to the proper proportions for mixing so you won’t have to come back to restock mid way through mixing.
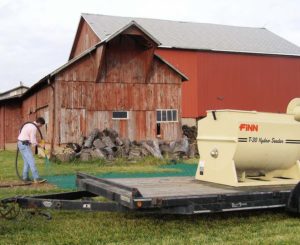
To mix the seed, if you have a paddle agitator like the Finn T60 HydroSeeder®, turn the machine on and let it warm up. It’s a good idea to flush the hoses before you begin mixing, so fill the tank with water to 50 gallons or so and flush the system. Once the water level has reached the agitator line, then set the paddles to reverse at a slower speed, like 15%, and begin to add the materials. While the order you add materials doesn’t necessarily matter, using this method can help with consistent seed dispersal — a good rule of thumb is to add the seed first, followed by mulch and then fertilizer, if you’re using them. Tackifiers or bonding agents should come last, if you’re planning on using them. You’re looking for the mixture to be uniform — without large clumps or chunks. Once the materials are added, plan on mixing your slurry at least five minutes to achieve the right consistency. You can increase the paddle speed at this point to help with the mixing consistency.
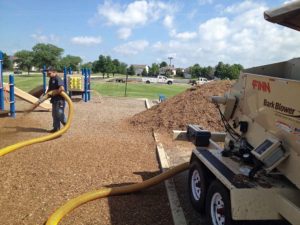
Step 4: DIY Hydroseeding
Once your slurry is thoroughly mixed, you’re ready to start the application. While each hydroseeder will have specific operating instructions, there are some general tips to learn how to use a hydroseeder effectively:
Make sure to turn down the agitator before you begin spraying — you want the slurry moving while you apply — but not moving too fast. So after you’ve mixed the slurry, turn it down so you can see it slowly mixing but not so fast that it’s sloshing out of the tank. A good speed is about 50%, or slightly less.
You can generally choose to apply from the tower or from the hose, and when doing this you want to make sure that your valves are all properly positioned. If the tower valve is engaged while you’re spraying from the hose, or vice versa, you’ll end up with a mess.
Once you’ve decided how you’ll spray — larger areas are often easier to spray from the tower, while smaller, more nuanced ground makes a great target for hose application — you can begin the process.
This is where the dye comes in very handy, as it helps you see exactly where you’ve applied seed so you can cover ground more evenly and consistently. Cover the ground as evenly as possible, laying down a thin layer of hydromulch. For more control and precision, use lower RPMs while spraying, higher RPMs can help you cover more ground, more quickly.
Step 5: Caring for Hydroseed
After you’ve covered your area with hydromulch, you’ll want to allow about a day for it to dry before you begin watering. Newly-hydroseeded ground requires a lot of water, especially initially, to help seeds germinate and take root well.
Expect to water 2-3 times per day for the first week or two. After that, continue watering daily to ensure enough moisture for optimal growth. The specific type of seed you use may come with instructions on watering, so be sure to read over the instructions for your particular product.
Learning how to use a hydroseeder can seem like a daunting process at first, but with the right research and the right resources at your disposal, you can accomplish do it yourself hydroseeding successfully. Learn more from the experts on our YouTube Channel or call a local dealer for more information.
Folow Finn Corporation on Social

How to Lay Mulch Evenly – When & Why to Use a Mulch Blower
Understanding the best way to spread mulch evenly can mean the difference between a great-looking, environmentally-friendly landscape, and one that falls short in both areas. From spreading mulch basics to how to spread mulch evenly, and when to use a mulch blower to achieve the desired results, these landscaper insider tips can help elevate your next project’s aesthetics and help…
Bark & Mulch Blowing 101
One of the best ways to enhance soil composition, prevent erosion, and improve the aesthetics of any landscaping project is to utilize bark and mulch blowing. For our purposes, bark and mulch blowing are effectively the same thing, and can generally be used interchangeably. Bark and mulch are both great choices to prevent weed growth and invasion, improve soil quality…
Hydroseed vs. Sod vs. Grass Seed
If you’re starting a lawn from scratch, you’ve probably come across the three common methods for seeding: sod, grass seed, and hydroseed. In order to determine the best choice for your yard, you may want to ask yourself a few questions before you get started, and familiarize yourself with each of the processes so you can make the right choice…